
Personalized –Digital First + Physical
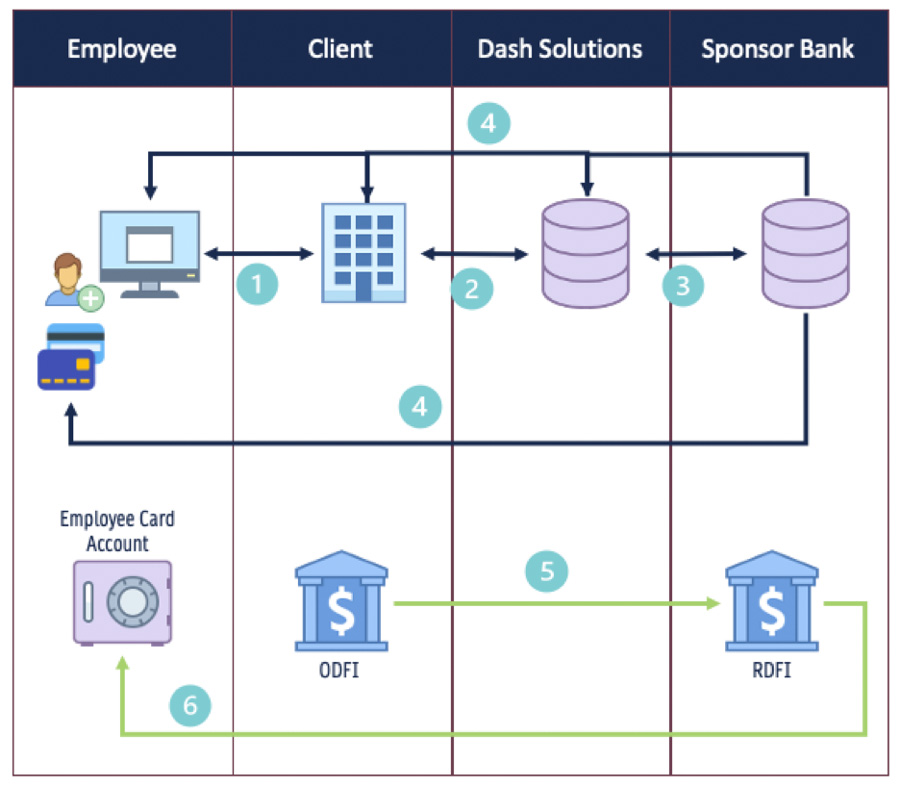
- Step 1: Employee is onboarded within the client HRIS / Payroll / PEO System.
- Step 2: Client will provide the required Employee data to Dash to issue a card to the Employee.
- Step 3: Dash will create the card account with the Sponsor Bank/Processor and return the PANProxy & DDA Account details for that Employee.
- Step 4: The Employee will receive an email and/or sms message allowing them to activate their card account for immediate access. A physical card will simultaneously be sent to the Employee.
- Step 5: Client will send due funds to the Employee using either the stored PANProxy or the DDA Account details.
- Step 6: The Employee card account is funded and available for use.
WALKTHROUGH
Step 1: Order / Issue Cards
Description:
This step will execute the creation of the card account and issue the card to the employee
Pre-requisites:
- sessionId – Acquired during the authentication process
- customerId – provided during client setup. Can be accessed from the /getCustomerList endpoint
- custProgId – provided during program setup. Can be accessed from the /getCustomerProgramList endpoint
Endpoint Details:
- API Endpoint – /orderendpoint/v1
- Call Type – POST
- Path – /orderCards
Considerations:
- Card Type designation of physical or digital will be used depending on the client configuration for issuing a physical card alone vs. a digital card with a physical being automatically sent
- Response will return 4 key identifiers that need to be stored by on the client side:
- orderId – This is a unique identifier for the order that will be used to physical card tracking
- proxyKey – This is an overall unique account identifier that is used for reference or ancillary API calls. This is also used in loan/unload calls for specific scenarios
- trn/dda – These two fields are the aba routing and account numbers for the virtual account that are used for loading funds.
- personId – This is used when updating employee profile data
Code Snippet:
Required Parameters
"sessionId": "uywbzibgbfgaienonrgyxahwuwegrtpssvvljdpypfkotqdjqsbydd10906"
{
"custProgId": 987654,
"customerId": 12345,
"orderProdType": "Personalized Payroll Order",
"cardType": "Digital",
"orderDetails": [
{
"firstName": "string",
"lastName": "string",
"phone": "string",
"email": "string", …
Step 3: Resend Digital Card Account Links
Description:
This step will trigger a resend of the email or sms notification to the Empoyee to activate and/or access the card feature through the digital experience.
Pre-requisites:
- sessionId – Acquired during the authentication process
- proxyKey – Acquired during the original order request
- cpId – provided during program setup. Can be accessed from the /getCustomerProgramList endpoint
Endpoint Details:
- API Endpoint – /orderendpoint/v1
- Call Type – GET
- Path – /sendDigitalCardAlert
Considerations:
- Response will return a success or failure
- Separate calls are needed between email or sms notification triggers
Code Snippet:
Required Parameters
"sessionId": "uywbzibgbfgaienonrgyxahwuwegrtpssvvljdpypfkotqdjqsbydd10906"
{
"cpId": 987654,
"proxyKey": 9376873800385,
"resendMethod": "[email] or [sms]",
"alertType": "Initial"
}…
Step 3: Order Details
Description:
This step will recall the complete order information
Pre-requisites:
- sessionId – Acquired during the authentication process
- orderId – Acquired during the order step
Endpoint Details:
- API Endpoint – /orderendpoint/v1
- Call Type – GET
- Path – /getOrderDetailsByOrderId
Code Snippet:
Required Parameters
"sessionId": "uywbzibgbfgaienonrgyxahwuwegrtpssvvljdpypfkotqdjqsbydd10906",
"proxyKey": "1234567890123",
"customerProgramId": ”987654"
Step 4: Shipping Details [OPTIONAL]
Description:
This step will recall the shipping information for the physical card delivery and provide tracking if available
Pre-requisites:
- sessionId – Acquired during the authentication process
- proxyKey – Acquired during the original order request
- custProgramId – provided during program setup. Can be accessed from the /getCustomerProgramList endpoint
Endpoint Details:
- API Endpoint – /orderendpoint/v1
- Call Type – GET
- Path – /getShippingInformation
Considerations:
For bulk or batch order, the /getOrderTrackingInfo endpoint should be used.
Shipping webhooks are available for pushing updates to client systems to reduce the resources required for pulling tracking on set schedules.
Code Snippet:
Required Parameters
"sessionId": "uywbzibgbfgaienonrgyxahwuwegrtpssvvljdpypfkotqdjqsbydd10906",
"proxyKey": "1234567890123",
"customerProgramId": ”987654"
Instant Issue – Non-Personalized
- Step 1: Employer order bulk inventory to hold on-site for allocation to new Employees.
- Step 2: Employee is onboarded within the client HRIS / Payroll / PEO System.
- Step 3: Employer will provide the required Employee data to Dash along with the Proxy from the inventory held on-site to register a Paycard to the Employee.
- Step 3: Dash will create the card account with the Sponsor Bank/Processor and return the PANProxy & DDA Account details for that Employee.
- Step 4: The Employee will receive an email and/or sms message allowing them to activate their card account through the My Dash Card app. Employees can also activate their card through the IVR with the number on the back of the card.
- Step 5: Employer will store the trn/dda number or the proxy for that Employee, to be sued for funding the card account related to pay cycles.
- Step 6: Employer will send due funds to the Employee using either the stored PANProxy or the DDA Account details.
- Step 7: The Employee card account is funded and available for use.
WALKTHROUGH
Step 1: Get Shipping Methods
Description:
This step will provide the available carrier and delivery speed methods available.
Pre-requisites:
- sessionId – Acquired during the authentication process
Endpoint Details:
- API Endpoint – /customerendpoint/v1
- Call Type – GET
- Path – /getShippingMethods
Considerations:
Response will return a list of current carrier and delivery speed identifiers to be used Step 2
Code Snippet:
Required Parameters
"sessionId": "uywbzibgbfgaienonrgyxahwuwegrtpssvvljdpypfkotqdjqsbydd10906"Step 2: Order Bulk Inventory
Description:
This step will execute the creation of the bulk inventory for physical cards to be delivered to a specified location.
Pre-requisites:
- sessionId – Acquired during the authentication process
- customerId – provided during client setup. Can be accessed from the /getCustomerList endpointcustProgId – provided during program setup. Can be accessed from the /getCustomerProgramList endpoint
Endpoint Details:
- API Endpoint – /orderendpoint/v1
- Call Type – POST
- Path – /orderCards
Considerations:
Response will return the orderId as the unique identifier for the order for reporting purposes
Code Snippet:
Required Parameters
"sessionId": "uywbzibgbfgaienonrgyxahwuwegrtpssvvljdpypfkotqdjqsbydd10906"
{
"custProgId": "{{cpIdIIC}}",
"customerId": "{{customerId}}",
"qty": 1,
"shippingMethod": "USPS First Class",…
Step 3: Inventory Status & Tracking
Description:
This step will provide a list of orders, status or orders, and tracking information (if applicable) based on defined criteria.
Pre-requisites:
sessionId – Acquired during the authentication process
customerId – Provided during client setup
startDate / endDate – Used to isolate orders for a specific time frame.
Endpoint Details:
API Endpoint – /customerendpoint/v1
Call Type – POST
Path – /getInventoryDetails
Considerations:
Response will return a list of orders based on the criteria provide in the payload
Order status and tracking information can be accessed here to follow inventory delivery
Code Snippet:
Required Parameters
"sessionId": "uywbzibgbfgaienonrgyxahwuwegrtpssvvljdpypfkotqdjqsbydd10906"
{
"customerId": 98709,
"startDate": "2025-01-23",
"endDate": "2025-02-08",
"orderStatus": [Ordered, Shipped, Failed],…
Step 4: Register
Description:
This step will assign a card in the onsite inventory to a specific Employee.
Pre-requisites:
- sessionId – Acquired during the authentication process
- proxyKey – Provided on the physical inventory
- custProgramId – provided during program setup. Can be accessed from the /getCustomerProgramList endpoint
- customerId – provided during program setup
Endpoint Details:
- API Endpoint – /fisendpoint/v1
- Call Type – POST
- Path – /registerCards
Considerations:
- Response will return a list of card elements including the detailOrderId
- The ProxyKey and/or routing/account numbers should be stored at this stage for loading the card based on the specific Employer’s funding flow.
Code Snippet:
Required Parameters
"sessionId": "uywbzibgbfgaienonrgyxahwuwegrtpssvvljdpypfkotqdjqsbydd10906"
{
"custProgId": "{{cpIdIIC}}",
"customerId": "{{customerId}}",
"orderDetails": [
{
"proxyKey": "string",
"email": "[email protected]",
"phone": "string",
"firstName": "string",
"lastName": "string",…
Step 5: Replace
Description:
This step will be used if an Employee already has a registered card that is lost or damaged and will issue them a new physical card from the inventory while keeping all of the underlying account data / balances the same.
Pre-requisites:
- sessionId – Acquired during the authentication process
- proxyKey – Acquired during the original order request
- cpId – provided during program setup. Can be accessed from the /getCustomerProgramList endpoint
Endpoint Details:
- API Endpoint – /fisendpoint/v1
- Call Type – POST
- Path – /replaceCard
Considerations:
- Response will return the same card details for the new card in line with what was returned during the register step.
- The proxy and routing/account number that was stored during the registration of the original card will be maintained for future loads.
Code Snippet:
Required Parameters
"sessionId": "uywbzibgbfgaienonrgyxahwuwegrtpssvvljdpypfkotqdjqsbydd10906",
{
"cpId": "{{cpIdIIC}}",
"proxyKey": "string",
"newProxyKey": "string"
}